IVR
The IVR section includes the most often used features while building your call-tree.
Features explained in this article
What is the IVR Branch?
The IVR Branch is used to create the setup of the call routing.This works by setting up individual branches to form one big tree, or one big system. Callers are automatically routed based on the branch setup when they call in- the branches tell the system where to take the caller according to his/her specific input. Each input of the caller will take him/her to another branch. Each branch is set up individually with its own functions, recordings, etc. It is like a puzzle where each branch functions as a puzzle piece. When all branches are joined together, they create the finished product.
Branch Structure
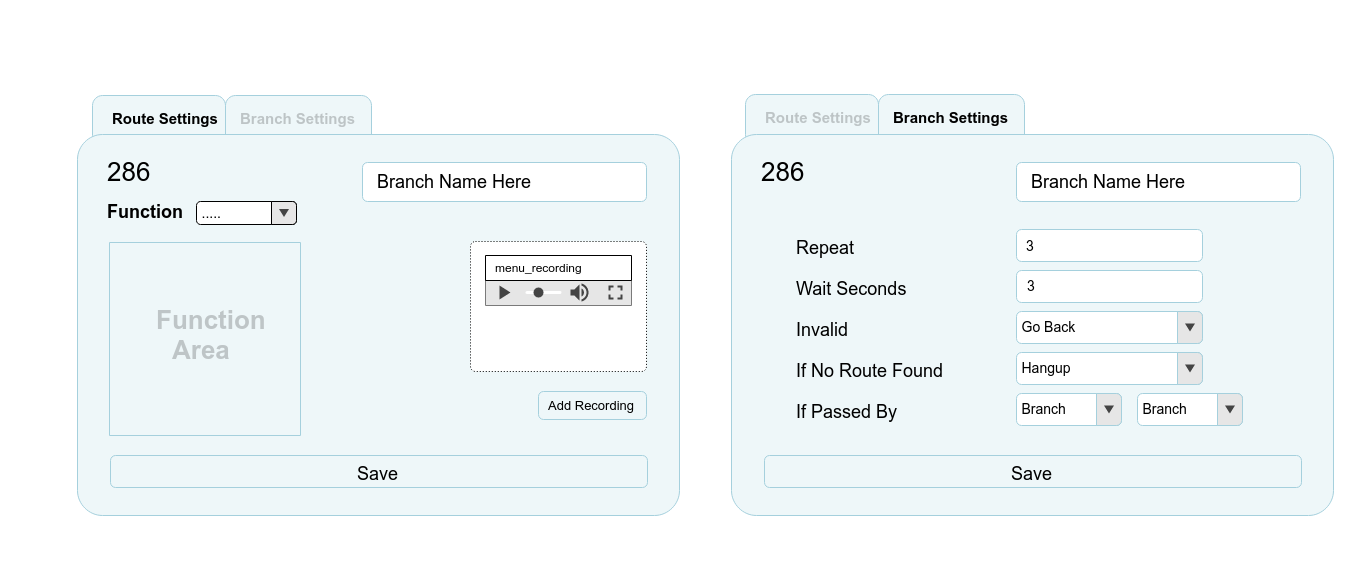
- Route Settings: the branch routing is set here. Each branch is set up individually and then linked to each other in the order desired.
- Branch Number: This is used for personal reference only. It will not affect the call routing in any way.
- Branch Name: This is meant for future personal reference. The branch name is usually used to identify what the branch is used for.
- Function: This is where the system is told what should happen when a caller reaches this branch. Each function selected will generate a different result. (More on individual functions at IVR…)
- Function Area: This area will be customized according to the function chosen. This is where all the settings pertaining to this specific branch will be set.
- Add Recording: This is used to add a recording to be played when the caller reaches this branch. When Add Recording is clicked, a recording from the library or a TTS recording can be chosen. The recording will then show as part of the branch structure, directly above Add Recording.
- Save: This is selected to save all changes made in the branch.
- Branch Settings: Basic branch settings are set here.
- Repeat: This will determine how many times the recordings saved in this branch should be repeated.
- Wait Seconds: This will determine how long the wait time should be between each recording saved in this branch.
- Invalid:
- If No Route Found: This will determine the action to be taken if the caller’s input has no set up route. Either hangup or go back can be selected.
- If Passed By:
- Save: This is selected to save all changes made.
Listen VM
This is used to be able to listen to voicemails left on the system. The selected VM boxes will play when calling in.
Modify Audio
This allows audio to be modified over the phone. Follow the directions given over the phone to make changes in your library.
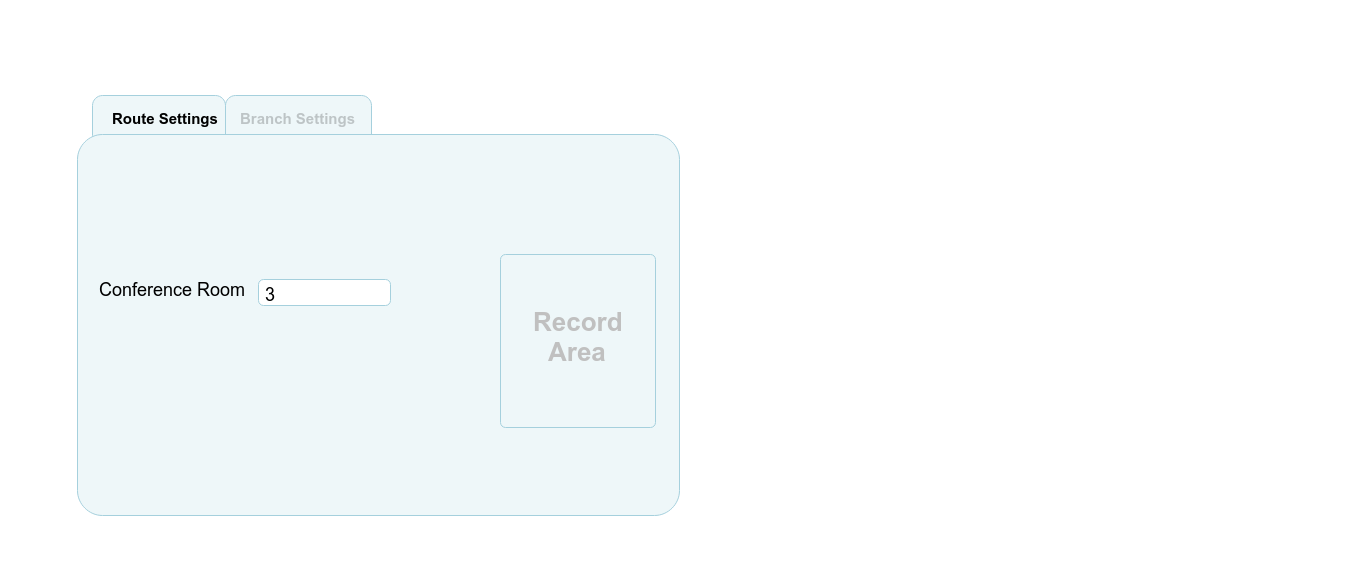
Conference

Conference is used to give callers the option of listening to a speaker live. (Please note that conference rooms need to be set up before this branch is added. More at Conference
To create a Conference branch:
- Click on IVR Branch in the black navigation located towards the left.
- Click on the blue plus sign at the bottom right to create a new branch.
- Select Conference as the function.
- Choose a conference room.
- Click Save.
(Please note that a separate Moderator branch needs to be set up for the moderator to receive access to the conference room.)
Moderator
A Moderator branch is used to give the moderator access to a conference room.
To create a Moderator branch:
- Click on IVR Branch in the black navigation located to the left.
- Click on the blue plus sign at the bottom right to create a new branch.
- Select Moderator as the function.
- Choose a conference room.
- Click Save.
(Please note that a conference branch needs to be created so the listeners have a place to listen to the moderator.)
Address Lookup
This will lookup the caller’s information (e.g. Caller ID).
Branch Dialed
Custom Input
This is used to enter a custom digit to be saved either by sending an email, or by using this information for the next branch.
- Poll Digit: The types of digits to be recognized by the system can be entered here.
- Review: If this is selected, the system will state the caller’s input and ask if they would like to change their input.
- Review Type: The caller’s input can be reviewed either automatically by selecting TTS, or with a custom recording. If custom is selected, a recording from the library can be chosen.
- Input Playback: The playback type of the digit entered by the customer can be chosen here. The options include TTS (automatic English recording), Yiddish numbers, and custom (an album can be chosen).
- Full NumberFull Number / Dollar amount / Single Numbers: This determines in what form the number should be reviewed.
- Confirm Message: A recording can be added to be played once the caller confirms their input. (If TTS is selected as the Review Type, this option will not be available)
- Alert Email: This will determine whether a notification is sent via email always, on input of the caller, or never.
- EmailEmail: The email address for notifications to be sent to can be selected.
- Goto: The branch for callers to be sent to after this branch can be selected.
Connect
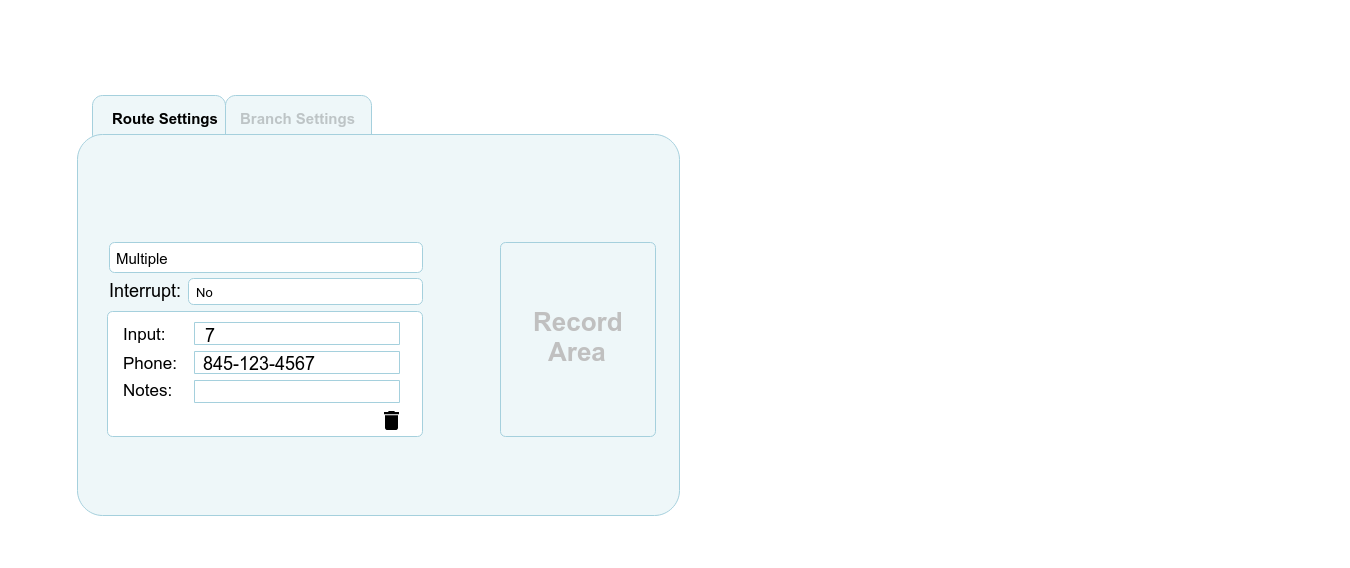
This is used to transfer callers to any number. Either Multiple, Direct, or Pattern can be selected:
- Multiple: This will allow callers to choose between a few numbers to be connected to.
- Interrupt
- Input: The digit(s) to be entered by callers to be transferred to this specific number can be entered here.
- Phone: The phone number to be transferred to can be entered here.
- Notes
- Direct: This will transfer the caller as soon as they reach this branch, with no other transfer options.
- Interrupt
- Phone: The phone number to be transferred to can be entered here.
- Notes
- Pattern: This will transfer from one number to the next until a transfer is successful.
Dial
This is used to make outgoing calls with the caller ID of the phone line.
- DIDDID: The number to come up as the Caller ID is selected.
- Interrupt: This determines whether the caller should be able to return to this line while the outgoing call is in progress, or when the call is over.
Transfer to Number
Transfer to Number is used to transfer callers to a different number (e.g. to connect to a representative) Enter the DID (phone number) to be transferred to.
Digit Dialed
Menu

Menu is the most used function. The caller is given a choice (menu) of what they can press and is then routed further based on their input.
So how does it work?
By default, a 'Menu' branch comes with 1 slot with the options of Input and Goto . For additonal options in the menu, click on Add Input.
- Input:The digit entered here will determine what the caller could press in order to interrupt the greeting and move further to its assigned 'Goto'.
- Goto: The branch entered here is where the caller will be sent upon pressing the above digit.
e.g. For a typical menu with the options of 1-Sales, 2-Support, 3-Leave a Message, three slots would be needed. In the first slot, a '1' would be entered as the input, and a branch chosen as the Goto. The rest of the options follow the same sequence: The digit for callers to input is entered, and then the branch to be sent to is selected.
A greeting is required in order for this function to work.
Poll
Record
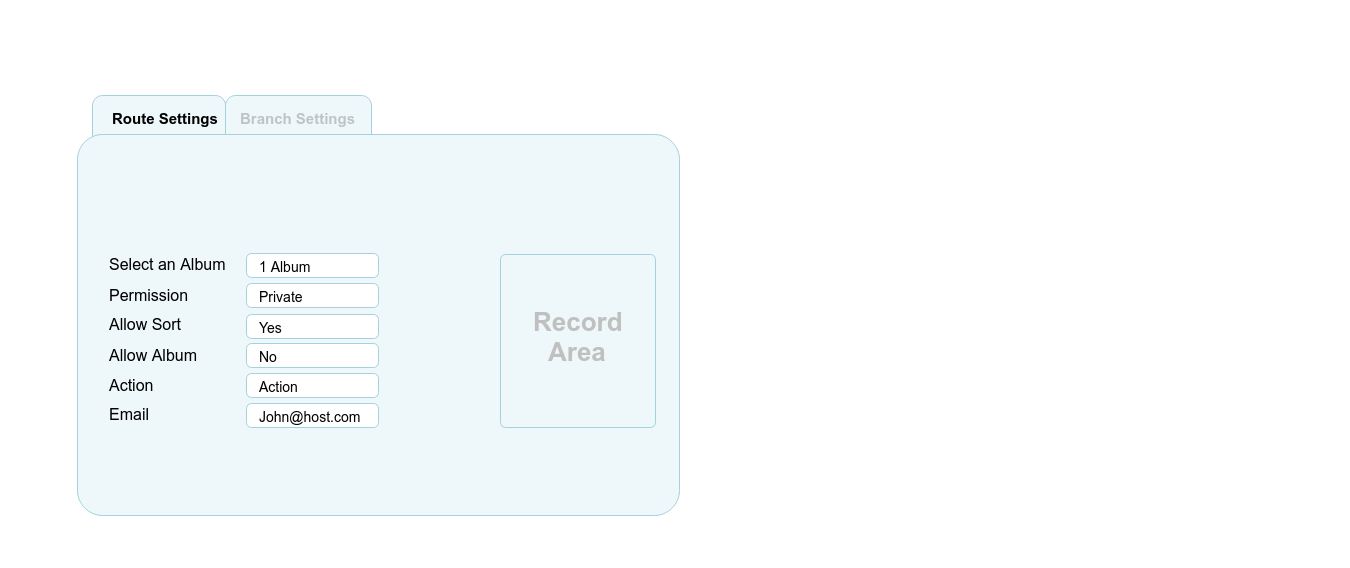
This function is used to record over the phone, and save the recording into one of the existing albums.
- Select an Album: Choose the album for the recording to go into.
- Permission: This determines whether the recording will need to be verified on our portal before going public (if callers already have a way to access that album).
- Public: Once the recording is saved, it will automatically go public.
- Private: Once the recording is saved, it will need to be verified on our portal before going public.
- Save & Public: Recordings will not need to be saved manually and will go public right away.
- Save & Private: Recordings will not need to be saved manually but will need to be verified on our portal before going public.
- Allow Sort: This determines whether the sort number can be entered when saving the recording or it should be assigned automatically.
- Allow Album: This determines whether the caller recording will be given the option of which album the recording should go into, or if it should automatically go into the entered album.
- Action: This determines whether the recording is a separate recording, a recording continuing after another recording, or the final recording of a series of recordings.
- Email: An email address can be entered for updates of recordings to be sent to. If no email is entered it will be sent to the default email address.
Play Album
Select an album from your library to be played.
Album Collection
This is used to play a collection of albums. Select either ‘Multiple’ or ‘Direct’ to either give callers the option of multiple albums to listen to, or just one album that will play as soon as this branch is reached.
- MultipleMultiple: Additional slots can be selected by clicking on Add Digits. The input required by the caller to listen to this album is entered as the ‘Digit’. Then follow the Directions at ‘Direct’.
- Direct
- Type: The type of action to be done with this album is selected:
- Choose Specific: This will allow callers to choose a specific recording in this album to be played.
- Album: Select the album to play.
- Change: An instruction album/audio can be selected. This album/audio will play when a caller reaches this branch, and the caller will be able to interrupt it by pressing for a specific recording.
- Continue: This determines whether other recordings in the album should continue playing after the recording selected has finished playing. If no is selected, the system will take thae caller to the No Route Found setting in Branch Settings.
- Play Album: This will play the album selected.
- Play Last (sort #): This will play the album selected starting from the latest recording.
- Goto Branch: A branch to go to when callers reach this branch can be entered here.
- Record: This is used to record over the phone into one of the existing albums.
- Select an Album: Choose the album for the recording to go into.
- Permission: This determines whether the recording will need to be verified on our portal before going public (if callers already have a way to access that album).
- Public: Once the recording is saved, it will automatically go public.
- Private: Once the recording is saved, it will need to be verified on our portal before going public.
- Save & Public: Recordings will not need to be saved manually and will go public right away.
- Save & Private: Recordings will not need to be saved manually but will need to be verified on our portal before going public.
- Allow Sort: This determines whether the sort number can be entered when saving the recording or it should be assigned automatically.
Auto Rotate
This tells the system to rotate recordings automatically at certain times.
The Type tells whether an album or a collection should rotate:
- Album
- Audio Album: The album for the system to rotate is selected.
- Current: This tells the system which recording is the current recording, so it will know where to go the next time it rotates.
- Time Slots
- Order ByOrder By: This tells the system in what order to rotate, from the highest or the lowest.
- Continue: This tells the system whether it should continue with the next recording in the album or stop after the alloted recording.
- Cycle: This tells the system how often to rotate.
- SkipSkip: This tells the system whether it should ever skip a rotation.
- IncrementIncrement: This tells the system how many recordings to skip over at each rotation.
- Last Route: This tells the system when the recordings last rotated so it knows when to rotate next.
- Rotate Albums
- Active: This activates the auto rotation.
- Collection
- Play Type
- Collection: This is where a collection is chosen (from the library)
- Current: This tells the system which recording is the current recording, so it will know where to go the next time it rotates.
- Time Slots
- Order By: This tells the system in what order to rotate, from the highest or the lowest.
- Continue: This tells the system whether it should continue with the next recording in the album or stop after the alloted recording.
- CycleCycle: This tells the system how often to rotate.
- Skip: this tells the system whether it should ever skip a rotation.
- IncrementIncrement: This tells the system how many recordings to skip over at each rotation.
- Last RotateLast Rotate: this tells the system when the recordings last rotated so it knows when to rotate next.
- Active: This activates the auto rotation.
Choose Specific
This is used to allow callers to choose a specific recording from the album selected. The system will play the recording whose sort number matches the caller’s input. A recording is required to let callers know what their options are.
- Continue: This determines whether the system continues playing the next recording in the album after the chosen recording has finished playing. If no is selected, the system will follow what is entered at No Route Found in the branch settings once the chosen recording has finished playing.
Assign Direct
This is used when a branch is needed for just a recording (e.g. hours)
Campaign
This is used for campaign playback. Callers can always hear the status of the campaign. The information that is played is taken from Merchant>Campaigns.
- Campaigns: The system will play the information of the campaign selected.
- Current Team Only: If this is selected, the system will say the information of the caller’s current team. Please note that the system will only know which team a caller is a part of if he is coming from a Mask branch which added the team’s contact to him.
- Play Total: This tells the system whether the total amount raised towards the campaign should be played.
- Play Total for Each Team: This tells the system whether the total amount raised towards the campaign should be played.
- Category: If Play Total for Each Team was selected, the categories of each team to play needs to be selected.
- All: This will play both the parents and children categories.
- Parents: This will play only the total amount of each team.
- ChildrenChildren: This will play the total amount raised for each child (sub-team).
- Play Donors Count: This will say how many donors there were (e.g $1000 was raised “by 25 donors”).
- Play Transactions: If this is selected, all donation transactions will be listed.
- Play Recording: If Play Transactions is selected, select whether messages left together with donations should play.
- Custom Recordings: If custom recordings are needed instead of the default ones, they can be selected here.
- Custom Amount Group: If a custom recording for the amounts is needed (e.g. if numbers are needed in a different language), an album in the library can be filled with recordings of all the numbers. The sort number needs to match the number in the recording so the system knows which number is which.
- Recording Group: An album with recordings to replace the default recordings can be selected. Then, the specific recordings should be entered. See the default recordings and replace accordingly.
Order
Pay
This is used to allow callers to make payments ober the phone.
ActionThis will tell the system what action to take when callers reach this branch.
- Amount: This will ask for the amount the caller would like to pay.
- Goto: The branch to be switched over to once the caller decides on an amount is entered here.
- Amount: If an amount is entered, the system will not ask for an amount but charge the pre entered amount at the checkout branch.
- Email: The system will automatically send an email to the entered email address each time a caller passes through this branch.
- Campaign: This is used if the payment is made towards a campaign. The system will then add it to the amount raised for this specific campaign..
- Ask Phone: If this is selected, the system will ask for the phone number of the caller.
- Please note: Once a pay branch with the action set to Amount is saved, another Pay branch with the action set to Checkoutneeds to be created in order for the payments to complete.
- Checkout: This completes payments. In the branch with Amount set as the action, the amount to be charged is determined. In a checkout branch, the amount is actually charged.
- Goto: The branch to go to once the payment is made can be selected here.
- Merchant: The merchant key is selected here. This will tell the system where to transfer the money received in this branch.
- Additional Amount: This will ask the caller whether they would like to pay an additional amount.
- Amount: If an amount is entered, this will be the additional amount charged. If left empty, the caller will have the choice of how much the additional amount should be.
- Email: An email address can be entered in order to receive a notification each time a payment is made. If no email is entered, a report will be sent to the default email address (saved in our system).
- Campaign: This is used of the payment is made towards a campaign. The system will then add it to the amount raised for this specific campaign.
- Monthly Subscription
Products
Tickets
Extension
This is used to connect callers to representatives using extensions.
- Multiple/Direct: This determines whether there is just one extension or callers can choose between a few.
- Interrupt: This determines whether callers return to this line once they’re done with the representative.
- Input: This determines what extensions callers need to input.
- Extension: An extension can be chosen (extensions need to be set up with us prior to setting this up).
- A voicemail to go to in case the extension does not go through can be chosen here.
- Ringtime
- Additional slots can be selected by clicking on ‘Add Digits’
Voicemail
This is used to leae messages (either the callers or the setting up). A voice mailbox first needs to be set up (Phone System>Voice Mails>Add Voice Mail Box).
Day of Week
A different branch to be switched over to when this branch is passed can be set for every day of the week.
Switch Timer
A timer can be set to take the callers to specific branches at specific times.
- Type: The timer can either be set for specific dates or hours of the day.
- Start: The date/hour when the switch timer should start can be entered.
- End: The date/hour when the switch timer should end can be entered.
- Goto: The branch that the system should take the client to when the switch timer is in effect can be selected.
- File: A file to play each time a caller is switched to a branch based on the timer can be selected.
Add Label
Add Label is used to add a contact under a specific label, so that when the caller will pass through a label branch set with this specific label they will be recognized and allowed passage to the next branch.
Select either Multiple or Direct in the dropbox below Function.
- Multiple: This will allow more than one label to be entered. The caller will then need to select which label to be added under.
- Allow Change: This will allow callers to call in from numbers not yet registered and enter their registered phone number to add the label onto their current number as well.
- Digit: The digit for the caller to enter in order to be saved under this label (entered below) should be entered here.
- Label: The label to be assigned to callers who input the above digit should be entered here.
- Goto: This will determine which branch callers newly assigned under this label should be taken to.
- File: A recording can be set to play once callers are assigned under this label.
- Add: Additional labels can be added for the caller to choose from.
- Direct: This will directly add this label to the caller, without giving any options for other labels.
- Allow Change: This will allow callers to call in from numbers not yet registered and enter their registered phone number to add the label onto their current number as well.
- Add to Another: This tells the system whether this label should be added to an existing contact:
- No
- Yes
- Yes & Merge
- Add to Another
- Goto: This will determine which branch callers are taken to once a label is added.
- File: A recording can be set to play once callers are assigned under this label.
Area Code
This is used to route calls from different area codes to different branches (ex. To a branch set up in their language).
- Goto: The system will transfer calls from the area code entered below to the branch selected.
- Area Code: The area code of the calls to be sent to the goto branch can be selected here.
- Add RecordingAdd R: A recording can be set to play once a caller’s area code was recognized.
- Add Area Code: Additional area codes to be recognized and routed accordingly can be selected.
Contact Data
Contact Data is used to enter or validate contact information, or to route a caller based on previously saved information.
- Type: Either Contact or Variable should be selected. Contact will determine that whatever happens in this branch will affect or be affected by a contact’s information. Variable will
- Action: Either Set or Validate should be selected. Set will ask the caller for new information and then save it. Validate will check previously entered information for reference throughout the call.
- Field/Variable Name: Field will determine the contact field where the information will be saved or taken from. Variable name will
- Data: Either Input or Auto is entered. This determines whether the caller will input information or a prespecified piece of information will be saved.
- Value: This determines what kind of information can be entered:
- If the dash (-) character is entered between 2 digits, the caller will be able to input any amount between the 2 digits. (e.g. 10-250, caller can input any number greater than 10 but less than 250.)
- If the comma (,) character is entered between a group of numbers, the caller will be able to input one of these numbers only. (e.g. 2,15,23,108, caller can input one of these specified numbers only.)
- If the parenthesis [ ] character is entered, the caller will be able to input any number in that amount of digits, (e.g. [20], caller can input any number but has to have 20 digits.)
- If just a digit is entered, the caller we be able to input that number only. (e.g. 33, can input only 33.)
- Go To: This determines what branch callers will be routed to once the contact data has been updated or validated.
Labels
This is used to allow only recognized callers to continue on to the next branch.
- Labels: Only contacts under the label/labels entered here will be allowed to continue on to the next branch. (Please note that callers need to be saved under this label either by manually saving the contact under this label, or by having callers pass through an Add Label branch.
- Goto: The branch to go to once the label is recognized can be added.
- Add Slot: More labels can always be added to send to a different branch for each label.
Mask
This function is used to allow contacts to go past a branch with a label even when they call from a number that is not yet saved in the system (if they are already registered under a different number). They will need to enter their contact information manually and the system will then put a mask onto the number they called from and refer to them as this contact for the duration of this conversation. If desired, the mask can be removed at any point by creating another Mask branck and selecting Cancel Mask. The mask will then be removed as soon as this branch is passed.
- For payments OnlyFor Payments Only: When selected, the client will be recognized with the mask only when making a payment, meaning that the payment will be registered under the mask contact’s name. The rest of the time the contact will be recognized by the actual number they are calling from.
- Field: The information to be entered by the contact can be set.
- Phone: This will ask for the contact’s registered phone number.
- A,B,C,D,E,: This will ask for the information entered in the contact’s Field A, B,C,D, or E (whichever is selected). This information can be entered when saving or editing a contact. (More at CONTACTS>FIELDS)
- Pin: This will ask for a special pin.
- Go To: The branch to go to once the mask is put on can be selected here.
- Labels: A label can be entered so that only masks under this label will be allowed past this branch. (More on labels: Cantacts>Labels / Sms>Labels)
Password
The system will ask for a password and will only allow entry to the next branch if the correct password is entered.
- Digit: The desired password can be entered here. This will be the password that callers will have to enter in order to pass through to the next branch.
- Goto: The branch to be transferred to once the correct password is entered can be set here.
- Expiration: An expiration date for this password can be entered. This is optional; if left empty, the password will never expire (but can be removed).
- Add Digits: More passwords can be added. Each password can be set to take to a different branch.
Remove Label
The label to be removed can be entered. When a caller passes through this branch, their label (if it matches the one entered here) will be removed.
API
Take advantage of our enhanced API system to integrate with your own software. Information can be processed and a response given to customers via the API build.
When a caller reaches an API branch, a request will be sent to your software. The request will include:
- A unique ID for that call
- The caller ID
- The branches passed by the caller and the input entered in each of them
- Any variables set
Below is an example of a request:
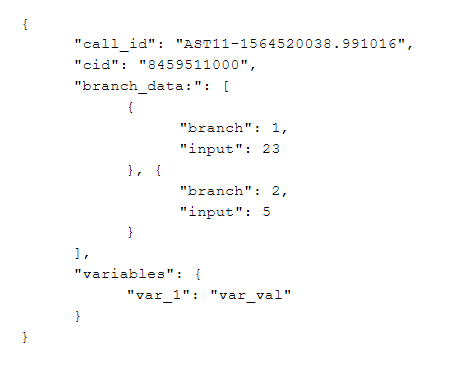
In this example, caller '845-951-1000' visited branch 1, in which they pressed '23'. In branch 2, the caller pressed '5'. The variable var_1 was set with a value of 'var_val1'.
The system will expect the following response:
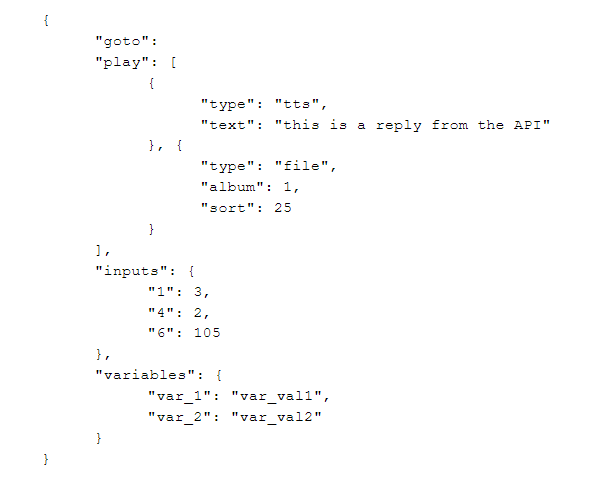
In this example, the system will play a TTS (Text to Speech) recording saying “This is a reply from the API” . It will then play file 25 of album 1 in the library. The system will also allow callers to press either ‘1’, ‘4’, or ‘6’. When a caller’s input is ‘1’, it will take them to branch 3. If the input is ‘4’, they will go to branch 2. Or if the input is ‘6’, they will go to branch 105.
Two variables are being set with this response: var_1’s value is ‘var_val1’ and var_2’s value is var_val2.
A general goto can also be entered with no inputs, so the system won’t wait for any inputs before taking the caller to the goto branch.